US Guided IV Access: Tips for Success
CASE
A 48 year-old female with idiopathic intracranial hypertension (IIH), with recent shunt removal, presented with increasing right eye vision loss over the last week, headache, and left-sided weakness. Her outpatient neuro-ophthalmologist referred her to the emergency department from clinic for a question of intracranial abscess, optic neuritis, or worsening IIH. She needed an MRI as soon as possible to rule-out these dangerous pathologies. A quick chart review showed that she has needed multiple central lines placed in the past, due to difficult IV access. The nurse was unable to place a peripheral IV.
Inserting a central venous catheter (CVC) is a possibility, but she does not need vasopressors or central venous pressure monitoring. CVC insertion also carries a complication rate of up to 15%.[1]
The less invasive option would be to insert an ultrasound guided IV. The following is a compilation of some best practices for placing these lines:
Materials matter
The type of IV you use is very important. Nurses in the ED are good at blindly placing IVs in superficial veins. If they haven’t been able to get a line in, then you will most likely have to go for a deeper vein, and thus you want a longer IV catheter, minimum 1 ¾ inches (4.45 cm), so that you can get more of the catheter in the vein. There are also IV catheters with guidewires that you can feed into the vessel, such as the BD AccuCath, much like you would for an arterial or central line.
Select your target with care
You probably didn’t get married to the first person you ever dated. So why would you settle on the first decent looking vein you see on ultrasound? First, make sure to put a tourniquet as high as possible on the patient’s arm. Then, using the linear probe, start scanning from the antecubital fossa proximally up the upper arm. You should encounter a few targets:
The basilic vein is often a great target because it is more superficial and is separated from surrounding arteries and nerves.[2] It is found on the medial side of the upper arm. Additionally, the deep brachial vein is another good target, but is deeper and surrounded by arteries and nerves (Figure 1).[2] Use the probe to find a vein that is ideally between 0.3 and 1.5 cm deep, as these depths have been shown to be easier to cannulate. Studies have also shown that a vein greater than 0.4 cm in diameter has greater success rate.[2] If you don’t see a good target on the first arm, go to the other arm. Once you’ve found an appropriate target, follow the vein proximally from where you want to enter it to ensure that it stays straight and does not split, which will enable easier catheter placement. You may also adjust the depth on the ultrasound machine to better assess the diameter of the vein, and adjust your gain accordingly. Ensure that the vessel you are looking at is a vein by visualizing that it is fully compressible on ultrasound (Video 1).
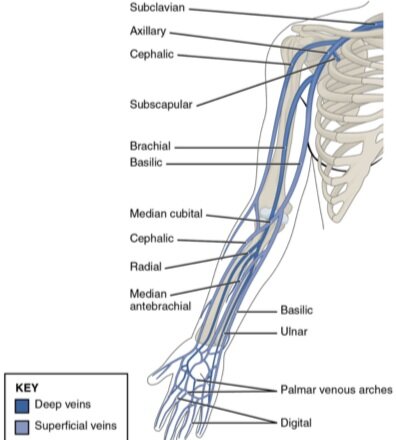
Figure 1. Anatomy of upper extremity venous vasculature.
Position properly
Emergency department rooms can be awkwardly arranged, ultrasound machines can be big, and patients can be in various positions. Take the time to properly position yourself, your patient, the ultrasound machine, and all the other equipment to optimize your chance of success.
Bed: Put the bed at a height where you will not have to bend over to insert the IV.
Patient: Make sure patient’s arm is at the proper height. If you need to, prop their arm up on blankets or pillows to make sure it is in position. It is also a good idea to abduct their arm, which makes it easier to access the medial side of the upper arm. If patient is not conscious, use tape to ensure their arm is in the position you want or get an assistant to help you.
Ultrasound machine and probe: The ultrasound machine should be on the opposite side of the bed, so that you can look straight ahead instead of behind. The probe marker on the screen should be on the same side on the patient. Usually that means it is on the left of your screen and the left of your patient. Make sure that your probe has been cleaned before starting your procedure.
Make your first attempt your best attempt
This is a very challenging procedure, but maximizing your first attempt can make it successful. Here are some tips for first time success:
a) Do not start until you have your target vessel clearly in the middle of the screen with your hand anchored on patients arm to ensure that it does not slide around.
b) If you poke the skin, and you see your needle impression too far to the right or left of the vessel, it might be best to just take it out and start again, until you see that you are tenting the tissue exactly in line with your vessel. If you are able to reposition your needle to be easily above the vessel, you can proceed.
c) Consider your angle!. If the vessel is very superficial, consider inserting the IV at a flatter angle, so you won’t poke through the back wall of the vein before you can find your tip. If it is deeper, than consider inserting the needle at a more vertical angle.
d) Out of plane or in plane? The out of plane (short axis) approach is more commonly used (Picture 1). In this approach, you visualize the vessel in cross section. It is imperative that you advance the probe with your needle tip in this approach, so that you don’t damage the back wall of the vein. You can also use the long axis approach, but that is beyond the scope of this post.

Picture 1. Using the “out of plane” approach; patient’s arm is at appropriate height, and U/S machine is on opposite side of bed.
The elusive needle tip
Finding the needle tip can be difficult. However, it is easy to see where the needle makes an impression in the soft tissue. Once the needle is through the skin, move it slightly up and down, and see exactly where it makes an impression. Make sure that it hasn’t gone deeper than the vein before you actually find that hyperechoic tip! Very slowly and carefully inch your probe either distally or proximally from where you inserted the needle, while holding the needle still, until you can see the tip.
If you are really having trouble finding the tip, but can see the impression of the needle right above the vein, you can advance it until you see it tent the wall of vein. Usually you will be able to see the needle tip at this point.
The target sign
Once you see the needle tip tenting the vessel, give it one more thrust to push it through. That is when you should see the “target sign,” which is the hyperechoic needle tip sitting in the middle of the vessel. At this point, you know that you are in the vessel, but your job is far from done. Keep looking at the ultrasound machine to ensure the tip is in the vessel. The less movement the better.
Drop your angle
Once you see the needle tip in the center of the vessel, drop the angle of your needle, advance your ultrasound probe a tiny amount until you don’t see your needle tip anymore, and then advance the catheter, ensuring that the needle tip is still in the center of the vessel when it comes back into view. Try to advance the needle with the angiocath in place for as long as possible.
Advances the catheter
Once you have advanced your needle tip deep into the vein, and you feel confident that you can feed your catheter, smoothly slide it over the needle into the vein. Secure your IV as you normally would, and confirm placement with blood return and easy flushing. As a bonus, you can push saline into the vein and see bubbles when visualizing a more proximal section of the vessel on ultrasound. This will again ensure that you are in the vessel.

Picture 2: Successfully placed ultrasound guided IV catheter still working 24 hours later
CASE RESOLUTION
The patient’s IV was placed and she received her MRI, which was negative for any acute neurosurgical process. She was admitted to neurology, and upon visiting her in the hospital 24 hours later, her IV was still in place and flushing well, having saved her from painful needle sticks and unnecessary CVC placement.
TAKE-AWAYS
Ultrasound-guided IVs are an important tool for getting access in a challenging patient
The basilic vein on the upper arm is a great target
Make sure you see the target sign and advance your angiocatheter into the vessel as far as possible with the needle still in it before feeding the catheter.
Faculty Reviewer: Dr. Kristin Dwyer
REFERENCES
Schoenfeld, Elizabeth, et al. “Ultrasound-Guided Peripheral Intravenous Access in the Emergency Department: Patient-Centered Survey.” Western Journal of Emergency Medicine, vol. 12, no. 4, 2011, pp. 475–477., doi:10.5811/westjem.2011.3.1920.2
Gottlieb, Michael, et al. “Ultrasound-Guided Peripheral Intravenous Line Placement: A Narrative Review of Evidence-Based Best Practices.” Western Journal of Emergency Medicine, vol. 18, no. 6, 2017, pp. 1047–1054., doi:10.5811/westjem.2017.7.34610.1