Brown Sound: Ultrasound Guided Lumbar Puncture
INTRODUCTION
We use ultrasound for a multitude of procedures in the emergency department, including central and peripheral venous access, abscess drainage, and joint aspiration. Less common, but just as useful, is the use of ultrasound to help identify landmarks when performing a lumbar puncture (LP). While the traditional method of LP is based on palpating anatomical landmarks, this is becoming increasingly difficult as the patient population becomes more obese. It may also be difficult in patients who have abnormal spinal anatomy or in those who have had previous spinal surgery. When palpating anatomy is difficult, ultrasound can be a useful tool to help identify appropriate landmarks and increase your LP success rate.
TRADITIONAL METHOD
As previously mentioned, LP is typically performed by palpating anatomical structures. The operator palpates the posterior superior iliac crests, and the imaginary line (Tuffier's line) between them is at the approximate level of the L4 vertebra.[1] Lumbar puncture can be performed at either the L3-4 or L4-5 interspace (i.e. just above or just below Tuffier’s line). After finding L4 and palpating for the interspace, the needle is inserted at the midline in the interspace and directed toward the umbilicus.[1]
Order of structures the needle passes through, superficial to deep (Figure 1):
Skin
Subcutaneous tissue
Supraspinous ligament
Interspinous ligament
Ligamentum flavum (characteristic “pop”)
Epidural space
Dura
Arachnoid
Subarachnoid space (contains CSF)
![Figure 1. Anatomy of the spine and spinal cord.[2]](https://images.squarespace-cdn.com/content/v1/56e8a86a746fb97ea9d14740/1595168640257-S9R7V2OHD74Y0JCACO87/image-asset.png)
Figure 1. Anatomy of the spine and spinal cord.[2]
UTILITY OF ULTRASOUND
In some patients, it may be difficult to palpate anatomical markers. This can be due to large body habitus, prior surgery, or abnormal anatomy (e.g scoliosis or degenerative changes).[1,3] In situations where anatomical landmarks cannot be easily palpated, or where the traditional approach has failed, ultrasound can be used to find the proper vertebrae and interspace, decrease the failure rate, and avoid reliance on consultant services to perform the LP. Additionally, ultrasound gives the user the ability to measure the distance from the skin to the ligamentum flavum for a better idea of the necessary needle length and insertion depth needed to reach the subarachnoid space.[3]
Multiple studies have evaluated the utility of ultrasound in lumbar punctures and conclude that ultrasound-assisted LPs have increased success rates, decreased number of attempts, decreased pain, and decreased number of complications, especially in obese patients. [1,3,4]
HOW TO PERFORM A GUIDED LP
Transducer
For pediatric patients and those with thin body habitus, a linear probe should be sufficient. For patients with larger body habitus, the curvilinear probe is preferred. [3]
Positioning
Patients can either be sitting or in a lateral decubitus position, as long as they remain in the position in which the ultrasound is performed.[3] While we recommend the sitting position, the lateral decubitus position is amenable to ultrasound localization as well, depending on patient comfort. Patient should also flex their neck to assist in enlargement of the interspinous space.
Step-by-Step Procedure [3,5,6,7]
1. Find the correct vertebra, using one of the following two options:
Use iliac crests as anatomical landmarks to approximate L4
Obtain a longitudinal axis view of the spine with ultrasound [Figure 2]
Probe in longitudinal axis, marker toward head, find midline
Slide the probe caudally until the sacrum is visualized
Slide the probe toward the head, counting L5 -> L4 -> L3
Mark L5, L4, L3
![Figure 2. Longitudinal ultrasound of L4, L5, sacrum.[8]](https://images.squarespace-cdn.com/content/v1/56e8a86a746fb97ea9d14740/1595169409420-B59T2W9X5IKYLTUU9MGL/image-asset.png)
Figure 2. Longitudinal ultrasound of L4, L5, sacrum.[8]
2. Identify the vertebral midine:
Place probe over the L4 spinous process in transverse plane, marker to the operator’s left (Figure 3a). This should appear as a hyperechoic crescent with a posterior acoustic shadow. The paraspinal muscles will appear as circular bundles on either side of the spinous process (Figure 3b).
Center the spinous process on the screen.
Draw a line on the patient at the center of the probe. Do this by drawing lines both above and below the probe, then remove the probe and connect the lines. This is the vertebral midline (Figure 3c).
![Figure 3a. Animation of transducer in transverse plane, probe marker towards the patient’s left.[9]](https://images.squarespace-cdn.com/content/v1/56e8a86a746fb97ea9d14740/1595169437321-KOZ0UF3F4MQXY0HD1CNY/image-asset.png)
Figure 3a. Animation of transducer in transverse plane, probe marker towards the patient’s left.[9]

Figure 3b. Ultrasound image of the short axis/transverse view of the L4 spinous process and surrounding paraspinal muscles.
![Figure 3c. Example of the line drawn on the patient (aligns with the middle of the probe).[7]](https://images.squarespace-cdn.com/content/v1/56e8a86a746fb97ea9d14740/1595169498683-Q8WV9LYAE6MFI93LSL38/image-asset.png)
Figure 3c. Example of the line drawn on the patient (aligns with the middle of the probe).[7]
3. Identify the interspinous space:
Rotate the probe 90 degrees clockwise so the probe is longitudinal and the marker is toward the patient’s head (Figure 4a).
Move the probe up and down so that there are two spinous processes on either side of the screen (one of them should be L4, so you are either finding the L3-4 or L4-5 interspace). Again, spinous processes are hyperechoic and concave, with posterior acoustic shadow. The interspinous space is between the two spinous processes (Figure 4b).
Center the interspinous space in the middle of the image.
Draw a line on the patient on both sides of the probe, then remove the probe and connect the lines (Figure 4c).
![Figure 4a. Animation of transducer in longitudinal plane, probe marker towards the patient’s head.[9]](https://images.squarespace-cdn.com/content/v1/56e8a86a746fb97ea9d14740/1595169537290-BZ4M8IGNKHDSFPQX2GC7/image-asset.png)
Figure 4a. Animation of transducer in longitudinal plane, probe marker towards the patient’s head.[9]
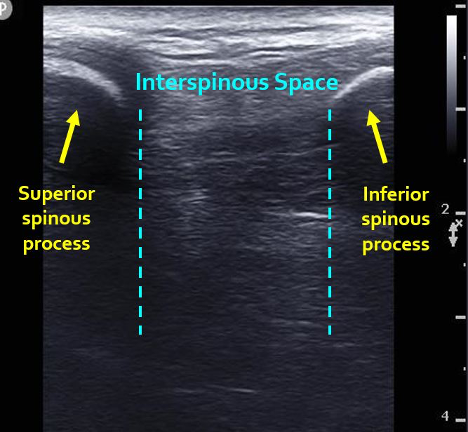
Figure 4b. Ultrasound image of the long axis/longitudinal view of the L3 and L4 spinous processes and L3-4 interspace.
![Figure 4c. Example of the line drawn on the patient (aligns with the middle of the probe).[7]](https://images.squarespace-cdn.com/content/v1/56e8a86a746fb97ea9d14740/1595169586189-BBY8YDHWENXC9J3J4P61/Picture4c.png)
Figure 4c. Example of the line drawn on the patient (aligns with the middle of the probe).[7]
4. The two lines now form a cross (Figure 5). Make an indent/mark at the center of the cross. This is the needle insertion site. Wipe the gel off and prep the area as you normally would for a lumbar puncture.
![Figure 5. Example of the final cross drawn on the patient.[7]](https://images.squarespace-cdn.com/content/v1/56e8a86a746fb97ea9d14740/1595169606012-QHM4EA57AQWSOJGKW12A/image-asset.png)
Figure 5. Example of the final cross drawn on the patient.[7]
5. Proceed with the lumbar puncture, inserting the needle at the center of the cross/indentation, aiming toward the umbilicus.
Author: Stephanie Hess, MD is a second-year emergency medicine resident at Brown.
Faculty Reviewer: Kristin Dwyer, MD, MPH is the director of the emergency medicine ultrasound fellowship at Brown
REFERENCES
1. Mofidi M, Mohammadi M, Saidi H, et al. Ultrasound guided lumbar puncture in emergency department: Time saving and less complications. J Res Med Sci. 2013; 18(4):303‐307.
2. Tintinalli JE, Stapczynski JS, Ma OJ, Cline D, Meckler GD, Yealy DM. Tintinalli's Emergency Medicine: A Comprehensive Study Guide. 8th ed. New York: McGraw-Hill Medical; 2015.
3. Soni NJ, Franco-Sadud R, Schnobrich D, et al. Ultrasound guidance for lumbar puncture. Neurol Clin Pract. 2016; 6(4):358‐368.
4. Nomura, Jason T. et al. A randomized controlled trial of ultrasound-assisted lumbar puncture. Journal of Ultrasound. Oct 1 2007, 1341-1348.
5. Nagdev A, Riguzzi C, Frenkel O, Mantuani D. How to Perform an Ultrasound-Assisted Lumbar Puncture. ACEP Now. https://www.acepnow.com/article/perform-ultrasound-assisted-lumbar-puncture/?singlepage=1. Published June 8, 2015. Accessed May 19, 2020.
6. MGH Ultrasound. Ultrasound Guided Lumbar Puncture; 2014. https://www.youtube.com/watch?v=DbqETxLurS0. Accessed May 19, 2020.
7. Vandordaklou N. Ultrasound Guided Procedures: Lumbar Puncture, Paracentesis and Thoracentesis. SAEM Lecture Series; 2013. https://vimeo.com/59095992. Accessed May 19, 2020.
8. Najman IE, Frederico TN, Segurado AV, Kimachi PP. Caudal epidural anesthesia: an anesthetic technique exclusive for pediatric use? Is it possible to use it in adults? What is the role of the ultrasound in this context? Rev Bras Anestesiol. 2011; 61(1):95‐109.
9. Sonosite Ultrasound. 3D How To: Ultrasound Guided Lumbar Puncture Procedure; 2011. https://www.youtube.com/watch?v=ndnZxAcNjdg. Access